
|
St. Martin-in-the-Fields Episcopal School Computer Lab |
 |
The Artist In Me
Middle School - Andy Warhol
Andy Warhol (8th Grade Only)
Biography Links:
- http://encarta.msn.com/encyclopedia_761554847/Warhol_Andy.html
- http://www.cosmopolis.ch/english/cosmo12/warhol.htm
- http://www.artchive.com/artchive/W/warhol.html
- http://www.factmonster.com/ce6/people/A0851472.html
- There is also a Powerpoint presentation about Andy Warhol available on Computer #6 in the lab
Create Your Own Art in the Style of Warhol:
Learn how Warhol created his silkscreen art at: http://www.warhol.org/interactive/silkscreen/main.html and then you will create your own art in this style using PhotoFiltre:
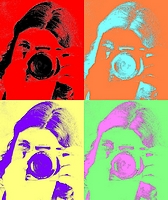
Sample "In The Style of" Warhol
- Photo Selection: In PhotoFiltre, use File > Open and find the photo of you on your computer and open it.
- Cropping: You may crop your photo if you wish - if you don't crop your photo, you will end up with an exact 4x6 photo at the end of this. Use the Selection Tool on the right-hand side of the screen (it's the white arrow pointing toward the top left) and draw a rectangle over the area you want to crop to. If you make a mistake, you can delete the selection by choosing: Selection > Hide Selection and starting over. Once you have the selection the way you like, go to Image > Crop and it will crop your photo.
- High Contrast B&W: Choose Adjust > Duotone - Color 1 should be black and Color 2 should be white. Play with the Threshold slider to adjust the amount of black and white; moving this to the left will add more white and moving it to the right will add more black. When you're happy with the levels, click ok. Note: If you want a little more texture or definition, then you can try one of the following filters on your photo to outline some of the edges before you do the duotone adjustment:
- Filter > Artistic > Comic Strip
- Filter > Artistic > Ink Outlines
- Duplicate Your Image 3 Times: Select Image > Duplicate 3 times. You should now have 4 identical b&w pictures.
- Color Time: Using complimentary colors can provide a nice contrast on these types of images. Complimentary colors are colors that are directly opposite one another on the color wheel - e.g., red & green, yellow & purple, blue & orange, etc.
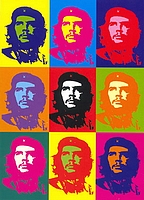
You will need to decide which colors you are going to use for each of your four pictures. If you're having trouble deciding, here's an example of what Warhol did with a picture of Che Guevara. You can pick a similar scheme or use one of your own.
- Add Color: Select one of your four photos and choose Adjust > Replace Color. Set Color 1 to black to recolor all of the black areas of the photo. Set Color 2 to the color you want the black area of the photos to be. You can preview this to see how it will look. Once you have the color selection you want, just click on OK to apply it. Now set Color 1 to white to recolor all of the white areas of the photo. Set Color 2 to the color you want the white to be when you are done. Repeat this step for your other three photos using different colors for each of them.
How can you make the face a different color than the background? In order to do this, you need to make sure that the face is separated from the background and clothing. If there are gaps where the white face meets the white background or white clothing then recoloring the face (easily) will also recolor the other item. In my photo the white of the face was not separated from the rest of the image so in the example below rather than making the face a different color, I made the front of the camera a different color.
So, how did I do this? Before I did the Replace Color step, I selected a color on the right hand side of the PhotoFiltre window and used the Flood Fill Bucket to fill the front of the camera with the color I selected. Then I replaced my black and white areas of the image as detailed above. Since the front of the camera was no longer black or white it didn't get replaced.
- Make It All One Picture: Once all four of your images are colored the way you like, we'll combine them into one image. There are multiple ways to do this but we're going to use a method that makes sure that all the edges line up without have to move the photos around manually.
First, let's put the top two pictures together:
- Click on the photo that you want on the top right-hand side.
- Select Edit > Copy.
- Click on the photo that will be on the top left-hand side
- Select Edit > Paste Special > Assemble.
- Make sure that Right is selected as the Assemble clipboard data option and then click OK. You should now have both of your top images together.
Now, let's put the bottom two pictures together:
- Click on the photo that you want on the bottom right-hand side.
- Select Edit > Copy.
- Click on the photo that will be on the bottom left-hand side
- Select Edit > Paste Special > Assemble.
- Make sure that Right is selected as the Assemble clipboard data option and then click OK. You should now have both of your bottom images together.
Now, let's put the top and bottom together:
- Click on your assembled bottom photos
- Select Edit > Copy.
- Click on the assembled top photos
- Select Edit > Paste Special > Assemble.
- Make sure that Bottom is selected as the Assemble clipboard data option and then click OK. You should now have one photo with all four images!
- Save Your Work: Select File > Save As. Your File Name should be: Your Name - Warhol. Make sure that the Save As Type is JPEG and then click Save. A dialog box will pop up. Move the compression slider all the way over to the right for best quality and make sure Standard is selected and then click OK.


Back to The Artist in Me - Middle School
St. Martin-in-the-Fields Episcopal School
7136 Winnetka Avenue
Winnetka, CA 91306
Phone: (818) 340-5144 Fax: (818) 340-5882
E-mail: stmartinsschool@aol.com